Choose your model
7th Gen Hilux High Clearance Front Bumper Kit
Toyota Hilux
Toyota Toyota Hilux CO107388Product ID: 11435
Mandona
There are many variations of passages of Lorem Ipsum available, but the majority have suffered alteration in some form, by injected humour, or randomised words which don't look even slightly believable. If you are going to use a passage of Lorem Ipsum, you need to be sure there isn't anything embarrassing hidden in the middle of text.
Create an account to put this in your wishlist.
Go to wishlistCreate an account to put this in your wishlist.
7th Gen Hilux High Clearance Front Bumper Kit
Toyota Hilux
Toyota Toyota Hilux CO107388Product ID: 11435
Ships within 3-10 business days with 2 day shipping
Ships within 3-10 business days with 2 day shipping
Choose
your variation
4.6
( 215 Google reviews)
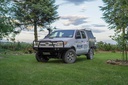
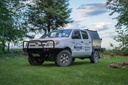
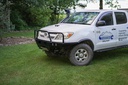
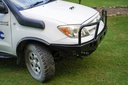
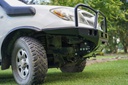
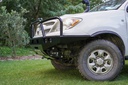
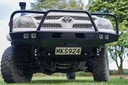
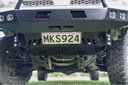
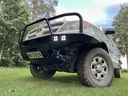
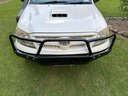
The profile of this bumper has been designed with maximum ground clearance and approach angles put first. The bumper sits as high and tight to the front of the 7th Generation 2005-2015 Toyota Hilux, while the angled lower faces will smoothly slide over obstacles and ensure you do not get hung up on the trail. The side wings of this bumper wrap around to the front wheel wells and tie directly into the main frame mounting plates for true offroad protection. These side wings will take a serious hit without flexing or deflecting into the vehicle body. We know that most Toyota Hilux owners want to run oversized tires and more aggressive wheel offsets. This can create interference issues with the stock front bumper. We have thought ahead and specifically designed these bumper side wings to easily clear 37" tires. This bumper uses a total of 16 factory mounting points to solidly mount it to the frame. While this is certainly overkill, this distributes impact and winching forces evenly across your frame and makes for one of the strongest mounting interfaces of any bumper on the market. This bumper is also available with an optional lower skid plate that provides a smooth surface to slide across trail obstacles and protects your vulnerable engine bay parts. This skid plate is fully CNC-bent into shape and only requires two very small spot welds to complete it.
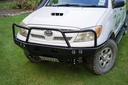
We finished this bumper off with integrated light buckets for surface mount LED pod lights (custom light cut outs available by request), an integrated winch mount to accept all standard 8-12k lb winches with removable solenoids, and heavy duty 9/16" (15mm) thick recovery points that are placed directly in line with the 7th gen Toyota Hilux frame to eliminate any leveraging effects. These recovery points are formed by laser cut steel plates that pass through the bumper shell and bolt directly to the Toyota Hilux frame as part of the bumper's main mounting brackets. The recovery points then get welded to the in and outside of the bumper shell. These factors all combine to form recovery points that minimize stress on your Toyota Hilux frame and are essentially indestructible! What could make this bumper even better? The low profile design has resulted in very reasonable weights of 89.6 lbs (40.7 kg) for the steel bumper and 44.2 lbs (20.1 kg) for the aluminum version. Considering that this bumper replaces your factory bumper and associated components (24.2lbs (11 kg)), the resulting weight increase to your Toyota Hilux is negligible at best. This minimizes added stress on your vehicle, maintains precious payload capacity, and allows you to keep your factory suspension if desired.
•DIY Weld-together kit - This bumper arrives as precision CNC-laser cut and bent pieces that you then weld together (detailed assembly instructions included)
•CNC-bent plates greatly reduces amount of welding and grinding required by you and makes for a cleaner finished product
•NO modification or welding of the actual vehicle frame required - this bumper can be installed and removed from your 7th Generation 2005-2015 Toyota Hilux without a trace that it was ever there!
•Low profile design is engineered to provide maximum ground clearance and complement the factory body lines - bumper protrudes less than 2" (50mm) from the vehicle body in the center.
•Maintains part of the factory plastic bumper for reduced weight and cleaner lines. Trimming of factory plastic bumper is required but we provide a very detailed and beginner-friendly guide on making this cut trouble-free.
•Fits 4 door and extended cab Models
•Heavy duty 3/16" (5mm) plate steel construction for maximum offroad strength and durability
•Optional 1/4" 5052 aluminum for a lightweight yet very durable overlanding setup (45.4lb weight savings)
•Bolts directly to frame using a total of 16 factory mounting points
•Protected winch mount fits all standard 8000-12,000lb winches with removable solenoids
•Reinforced 9/16" (15mm) thick clevis mounts allow the use of 3/4" D-Rings and pull directly off of the frame for confident recoveries of heavily loaded vehicles
•Four integrated LED pod mounts – included slotted mounting tabs give tons of adjustment to fit a variety of lights
•Integrated license plate mount
•Optional heavy duty grill and headlight tubing hoops for added protection
•Center-only bumper section is available by special request for those who would like to build their own hybrid tube bumper, please send us an email for more info!


7th Gen Hilux High Clearance Front Bumper Kit
Toyota Hilux Toyota
NZD$ 1,080.19Product ID: 11435
Product overview
The profile of this bumper has been designed with maximum ground clearance and approach angles put first. The bumper sits as high and tight to the front of the 7th Generation 2005-2015 Toyota Hilux, while the angled lower faces will smoothly slide over obstacles and ensure you do not get hung up on the trail. The side wings of this bumper wrap around to the front wheel wells and tie directly into the main frame mounting plates for true offroad protection. These side wings will take a serious hit without flexing or deflecting into the vehicle body. We know that most Toyota Hilux owners want to run oversized tires and more aggressive wheel offsets. This can create interference issues with the stock front bumper. We have thought ahead and specifically designed these bumper side wings to easily clear 37" tires. This bumper uses a total of 16 factory mounting points to solidly mount it to the frame. While this is certainly overkill, this distributes impact and winching forces evenly across your frame and makes for one of the strongest mounting interfaces of any bumper on the market. This bumper is also available with an optional lower skid plate that provides a smooth surface to slide across trail obstacles and protects your vulnerable engine bay parts. This skid plate is fully CNC-bent into shape and only requires two very small spot welds to complete it.
We finished this bumper off with integrated light buckets for surface mount LED pod lights (custom light cut outs available by request), an integrated winch mount to accept all standard 8-12k lb winches with removable solenoids, and heavy duty 9/16" (15mm) thick recovery points that are placed directly in line with the 7th gen Toyota Hilux frame to eliminate any leveraging effects. These recovery points are formed by laser cut steel plates that pass through the bumper shell and bolt directly to the Toyota Hilux frame as part of the bumper's main mounting brackets. The recovery points then get welded to the in and outside of the bumper shell. These factors all combine to form recovery points that minimize stress on your Toyota Hilux frame and are essentially indestructible! What could make this bumper even better? The low profile design has resulted in very reasonable weights of 89.6 lbs (40.7 kg) for the steel bumper and 44.2 lbs (20.1 kg) for the aluminum version. Considering that this bumper replaces your factory bumper and associated components (24.2lbs (11 kg)), the resulting weight increase to your Toyota Hilux is negligible at best. This minimizes added stress on your vehicle, maintains precious payload capacity, and allows you to keep your factory suspension if desired.
•DIY Weld-together kit - This bumper arrives as precision CNC-laser cut and bent pieces that you then weld together (detailed assembly instructions included)
•CNC-bent plates greatly reduces amount of welding and grinding required by you and makes for a cleaner finished product
•NO modification or welding of the actual vehicle frame required - this bumper can be installed and removed from your 7th Generation 2005-2015 Toyota Hilux without a trace that it was ever there!
•Low profile design is engineered to provide maximum ground clearance and complement the factory body lines - bumper protrudes less than 2" (50mm) from the vehicle body in the center.
•Maintains part of the factory plastic bumper for reduced weight and cleaner lines. Trimming of factory plastic bumper is required but we provide a very detailed and beginner-friendly guide on making this cut trouble-free.
•Fits 4 door and extended cab Models
•Heavy duty 3/16" (5mm) plate steel construction for maximum offroad strength and durability
•Optional 1/4" 5052 aluminum for a lightweight yet very durable overlanding setup (45.4lb weight savings)
•Bolts directly to frame using a total of 16 factory mounting points
•Protected winch mount fits all standard 8000-12,000lb winches with removable solenoids
•Reinforced 9/16" (15mm) thick clevis mounts allow the use of 3/4" D-Rings and pull directly off of the frame for confident recoveries of heavily loaded vehicles
•Four integrated LED pod mounts – included slotted mounting tabs give tons of adjustment to fit a variety of lights
•Integrated license plate mount
•Optional heavy duty grill and headlight tubing hoops for added protection
•Center-only bumper section is available by special request for those who would like to build their own hybrid tube bumper, please send us an email for more info!

Key specifications
The profile of this bumper has been designed with maximum ground clearance and approach angles put first. The bumper sits as high and tight to the front of the 7th Generation 2005-2015 Toyota Hilux, while the angled lower faces will smoothly slide over obstacles and ensure you do not get hung up on the trail. The side wings of this bumper wrap around to the front wheel wells and tie directly into the main frame mounting plates for true offroad protection. These side wings will take a serious hit without flexing or deflecting into the vehicle body. We know that most Toyota Hilux owners want to run oversized tires and more aggressive wheel offsets. This can create interference issues with the stock front bumper. We have thought ahead and specifically designed these bumper side wings to easily clear 37" tires. This bumper uses a total of 16 factory mounting points to solidly mount it to the frame. While this is certainly overkill, this distributes impact and winching forces evenly across your frame and makes for one of the strongest mounting interfaces of any bumper on the market. This bumper is also available with an optional lower skid plate that provides a smooth surface to slide across trail obstacles and protects your vulnerable engine bay parts. This skid plate is fully CNC-bent into shape and only requires two very small spot welds to complete it.
We finished this bumper off with integrated light buckets for surface mount LED pod lights (custom light cut outs available by request), an integrated winch mount to accept all standard 8-12k lb winches with removable solenoids, and heavy duty 9/16" (15mm) thick recovery points that are placed directly in line with the 7th gen Toyota Hilux frame to eliminate any leveraging effects. These recovery points are formed by laser cut steel plates that pass through the bumper shell and bolt directly to the Toyota Hilux frame as part of the bumper's main mounting brackets. The recovery points then get welded to the in and outside of the bumper shell. These factors all combine to form recovery points that minimize stress on your Toyota Hilux frame and are essentially indestructible! What could make this bumper even better? The low profile design has resulted in very reasonable weights of 89.6 lbs (40.7 kg) for the steel bumper and 44.2 lbs (20.1 kg) for the aluminum version. Considering that this bumper replaces your factory bumper and associated components (24.2lbs (11 kg)), the resulting weight increase to your Toyota Hilux is negligible at best. This minimizes added stress on your vehicle, maintains precious payload capacity, and allows you to keep your factory suspension if desired.
•DIY Weld-together kit - This bumper arrives as precision CNC-laser cut and bent pieces that you then weld together (detailed assembly instructions included)
•CNC-bent plates greatly reduces amount of welding and grinding required by you and makes for a cleaner finished product
•NO modification or welding of the actual vehicle frame required - this bumper can be installed and removed from your 7th Generation 2005-2015 Toyota Hilux without a trace that it was ever there!
•Low profile design is engineered to provide maximum ground clearance and complement the factory body lines - bumper protrudes less than 2" (50mm) from the vehicle body in the center.
•Maintains part of the factory plastic bumper for reduced weight and cleaner lines. Trimming of factory plastic bumper is required but we provide a very detailed and beginner-friendly guide on making this cut trouble-free.
•Fits 4 door and extended cab Models
•Heavy duty 3/16" (5mm) plate steel construction for maximum offroad strength and durability
•Optional 1/4" 5052 aluminum for a lightweight yet very durable overlanding setup (45.4lb weight savings)
•Bolts directly to frame using a total of 16 factory mounting points
•Protected winch mount fits all standard 8000-12,000lb winches with removable solenoids
•Reinforced 9/16" (15mm) thick clevis mounts allow the use of 3/4" D-Rings and pull directly off of the frame for confident recoveries of heavily loaded vehicles
•Four integrated LED pod mounts – included slotted mounting tabs give tons of adjustment to fit a variety of lights
•Integrated license plate mount
•Optional heavy duty grill and headlight tubing hoops for added protection
•Center-only bumper section is available by special request for those who would like to build their own hybrid tube bumper, please send us an email for more info!
Key specifications
-
David Beaudet
-
Phillip Miller (ZomBud)
-
Gerry B
-
Eric T